[ad_1]
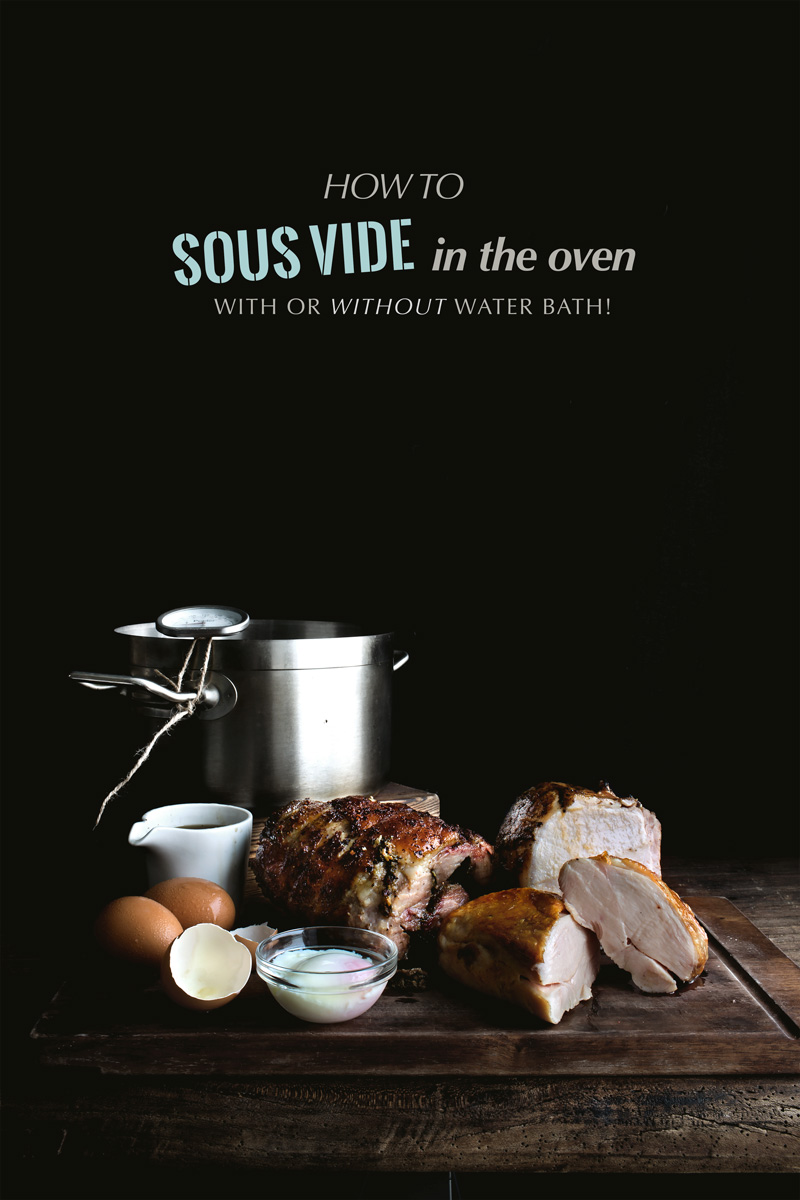
HOW TO EASILY SOUS-VIDE IN OVEN, WITH OR WITHOUT WATER
FOR THE PAST 35 YEARS OF SOLEMN HATRED FOR WHITE MEAT, OF CLAWING CHICKEN SAWDUSTS OUT OF MY THROAT, IT MEANS TO TELL ME THAT ALL ALONG, I COULD’VE BEEN EATING THIS SUCCULENCE?!!
IS THIS A JOKE?!!
[ezcol_1half]
Let’s face it, most of us never took the idea of “sous vide” seriously as a realistic potential in our home-kitchen, now did we? But now there are so many sous vide devices on the market today that it’s hard to ignore the growing popularity of it.
This French-sounding… European-ish words (“sus-vahyd”?) that refer to vacuum-sealing our ingredients and submerging them under a warm bath for a long period of time, thus resulting in the extraordinarily supple texture in any cuts of meat, okaaay, all sounds as wonderful as having little house-elf who rap us a Kanye song and clean around the house. Nice, clap clap, but who are we kidding right? Hey, believe me, I with you. Or… at least, I was with you… until a few weeks ago I swear.
I mean, as someone who loves to cook to a degree of obsessive nature, I’m all about humping a technique that, legend has it, could transform a cardboard-like piece of chicken breasts into something so juicy and tender that it defies my anti-faith for chicken breasts. But to acquire such wizardry, well, I’ll need a wand of course, and it’s called a sous vide-machine. Thing is I would gladly “sus-vahyd” everything – hey I think it totally makes total sense – IF ONLY I was sitting on a machine that sucks all the air-molecules out of the bags, and another that keeps my tub of water at a constant temperature without asking too many questions. But guess what, I don’t have a sous vide-machine”s”, and I’m guessing you probably neither. I guess, we’re all just muggles! So in the end, the idea all goes back to resembling a fabulous Dobby who raps Kanye ? not a realistic potential. Or is it?
A few weeks ago, I was introduced to Chef Steps, a great blog that promotes “Modernist Cuisines for home-cooks”, and at the top of its honorable agenda, is the mission to teach everyone how to sous vide at home, without any machines that is. It gave me hope, it really did. I considered it as an invitation into Hogwars. So I immediately dove into the first experiment, which was to tightly wrap salmon in a zip-lock bag and cook it in a pot of 120 F/50 C water that they said could be maintained over the stove… Okay, I would elaborate the experience in meticulous details for you but it could pretty much be summed up in one word, well, impossible. On gas-stove, on induction-stove… whatever, not even the lowest possible setting/flame could keep a pot of water at 120F/50C without heating it up eventually, not to mention the obvious impracticality and side-effect of babysitting a pot of lukewarm water for 40 min, or worse, hours… Chefs, it’s not you, but it doesn’t work on my stoves.
But to their credit, the effort wasn’t spent in vain. The episode curiously reminded me of how, a long time ago, I used to babysit a pot of water in oblivion for my hot spring/onsen eggs, only until the moment when I found out that… wait, I HAVE A HOUSE-ELF!
[/ezcol_1half] [ezcol_1half_end]
Ladies and gentlemen, may I introduce you to – Dobby, no, THE OVEN. Uh-humph, sorry, have you met? Yeah, it’s this really old piece of technology, dinosaur really, that was designed to, guess what, creating an environment at a… yes, constant temperature! OK, at this point, we’re not even gonna pretend that we’re “sous vide-ing” anything, which means “under vacuum” in French. We’re not vacuuming anything, but just keeping to the principle of cooking foods under low temperature for a prolonged period of time. And I don’t know if you know this about earth, but in most cases, the temperature of water will eventually level to the temperature of its surroundings. What it means is that a pot of 120F/50C water sitting inside an oven that is constantly at 120F/50C, will stay at… YES, 120F/50C!! Do you see where I’m going with this? Do you? With a little adjustment to the oven-setting to make up for the heat that goes into cooking our foods, my friends, this is your new kitchen-revelation.
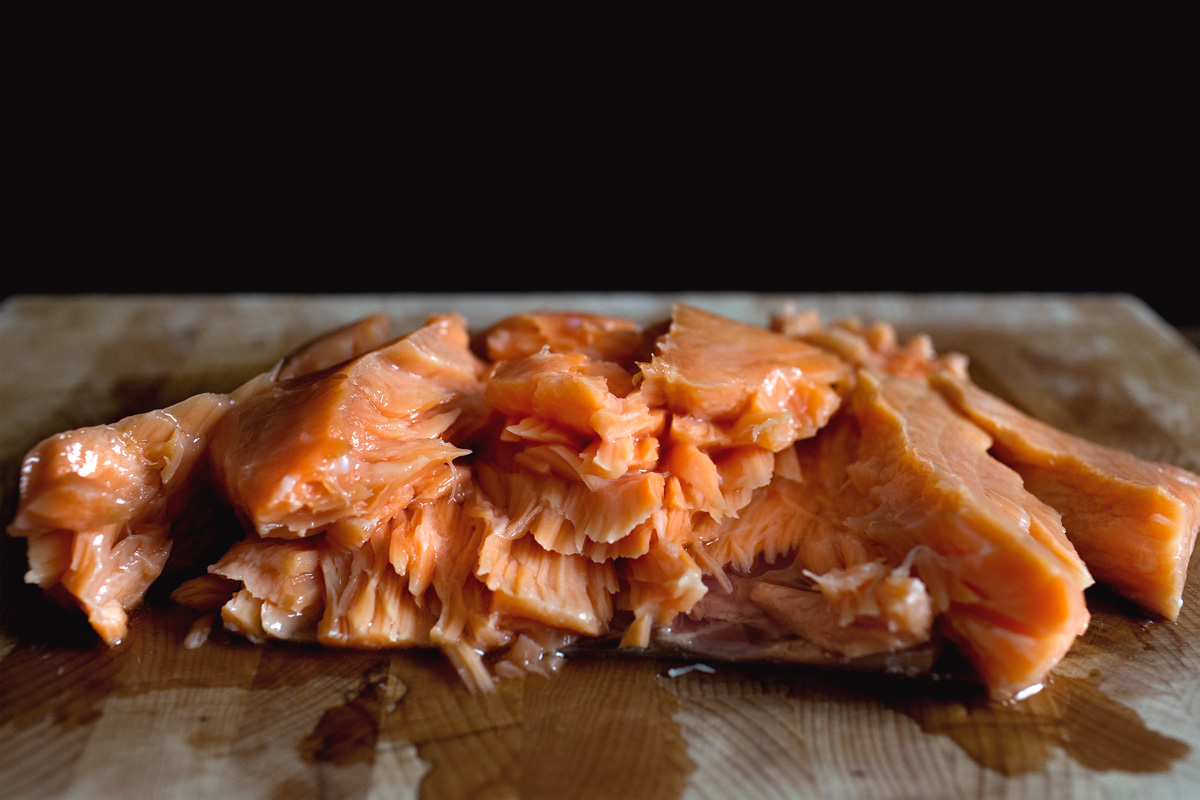
Results… the salmon, was a bite of the softest and warm embracive epiphany you could ever put in your mouth. I would replace it with how I cooked salmon in this recipe and gladly eat it for the rest of my lives. Then the chicken breasts… what chicken breasts? It transformed the chicken breasts into something… not of this earth, okay. This is not chicken breasts, not even chicken, because planet earth does not breed this type of animal which has an unbelievable texture as if a chicken screwed a water-balloon and had a baby on Mars that spoke French. The texture, the suppleness and bounce, is for a lack of better words, infuriating. It means to tell me that for the past 35 years of solemn hatred for white meat, the chicken-sawdusts that I’ve been clawing out of my throat, all along, could’ve been this succulence?!! Is this a joke?!!
But to my own surprise, amidst the simultaneous anguish and enlightenment, the wizardry didn’t stop here. Remember my sauna eggs? A little experiment I conducted based on the theory that, with a little adjustments in temperature and cooking-time (difference in air and water heat-conductivity and such boring sciences, blah blah blah), the same water-bath results can be replicated by using dry-heat only as well. But does it work with things other than eggs? YES. The chicken breasts and salmon cooked inside a water-bath in the oven, VS the same ingredients being cooked simply wrapped up in parchment in dry heat at a different temperature/time, are essentially, undistinguishable.
You can “sous vide” in the oven, with or without water-bath.
It very much seemed like something only the pros used but with the knowledge of having the UK’s leading sous vide specialists in this very field, this idea may not seem as out there as some of us used to think. So here, my friends, screw being muggles, come to Hogwarts with me. With a simple thermometer and oven thermometer, let’s do magic. Okay, I also know that people’s ovens may not heat up correctly, or the thermometer may be off, etc. If you’re looking to continue this recipe correctly, then you will want to make sure your oven gets to the correct temperatures. Ensure to look at the likes of https:www.justin-appliance.com and similar websites to find repair options for your oven, then continue your magic! I will continue this experiment with more ingredients and do a Part II or perhaps even Part III, but for now, I think you’ll be too busy eating – can’t believe I’m saying this – chicken breasts. I guess it’s true, nothing is impossible.
[/ezcol_1half_end]
EQUIPMENTS YOU’LL NEED:
- For water-bath:
- A reliable oven, ok, reliable (my oven is an electric built-in oven, without fan)
- One 5 L (20 cups) stainless-steel pot
- One oven-proof water/meat thermometer
- One oven-thermometer
- Zip-lock bags
- No water-bath:
- A reliable oven, not kidding, reliable (my oven is an electric built-in oven, without fan)
- One oven-thermometer
- Parchment papers
UPDATE 10/04/2015: Please note that my oven is an electric built-in oven, without fan. The fan tends to cook foods faster, so if your oven comes with fan, simply turn it off.
[ezcol_2third]
 [/ezcol_2third] [ezcol_1third_end]
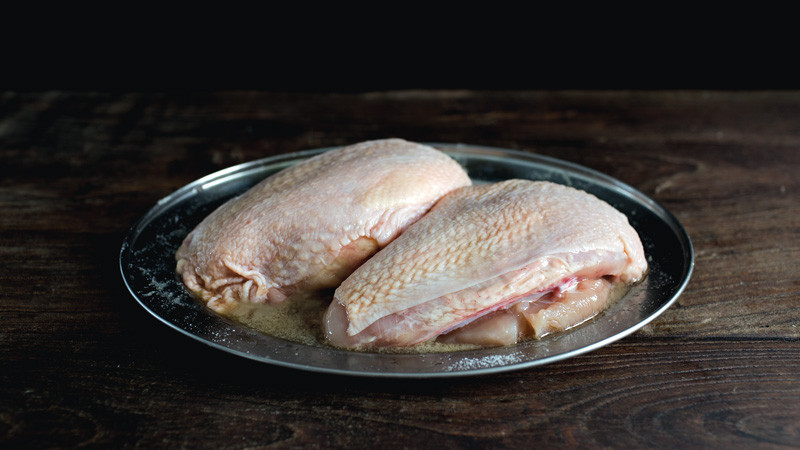
First, for chicken breasts, you can have them bone-in, bone-out, skin-on, skin-off, whatever. I personally prefer boneless, but skin-on chicken breasts. For each chicken breasts (not a “pair” of breasts but a single side), evenly rub 2 tsp of salt and 1 tbsp of neutral wine like Japanese sake, and let sit for 30 min. The salt seasons and draws excess water out of the breasts, bettering the flavours, and the sake gives the chicken a cleaner/more refined tastes.
[/ezcol_1third_end]
[ezcol_2third]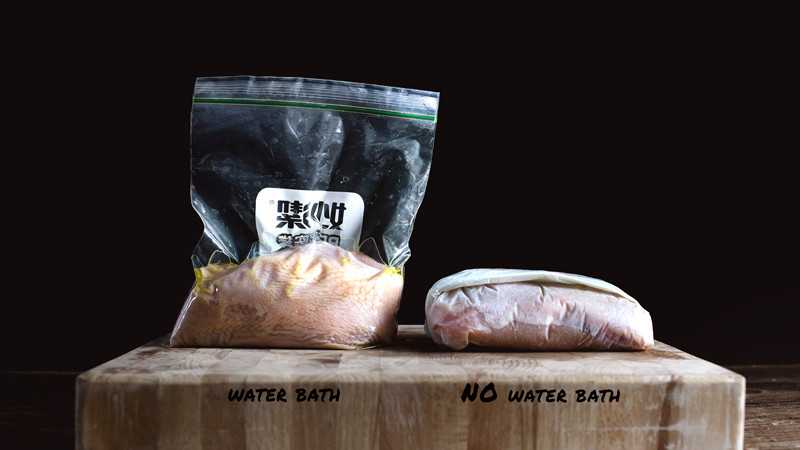 [/ezcol_2third] [ezcol_1third_end]
Rinse the chicken off of any excess salt then pat dry with a towel.
FOR WATER-BATH: place the chicken breast inside a zip-lock bag, then drizzle with just enough olive oil to coat evenly. Zip the bag until it’s 80% sealed, leaving a small air-slit. Then roll the chicken inside the bag tightly, squeezing out as much air as out of the bag as you can, then close the air-slit to seal the bag completely.
FOR NO WATER-BATH: place the chicken breast on top of a large piece of parchment, then coat it evenly with olive oil. Wrap the chicken tightly inside the parchment like wrapping a sandwich.
[/ezcol_1third_end]
[ezcol_2third] [/ezcol_2third] [ezcol_1third_end]
FOR WATER-BATH: We want to cook the chicken breasts in a 150 F/65 C water-bath for 1:00.
Preheat the oven 30 min ahead of time until the oven thermometer reads and stays at 175~185 F/80~85 C (the oven-temperature needs to be higher to make up for the heat-loss that goes into cooking the meat). Every oven is different, so you’ll need to get to know your oven a little. ALWAYS GO WITH THE TRUE TEMPERATURE ON THE THERMOMETER, and not the oven setting. My oven usually starts at a lower temperature when the preheating-light goes off, but then the temperature goes up pretty accurately after a 30 min of preheating-time. Meanwhile, tie the water/meat thermometer to the pot so it doesn’t fall, then fill the pot with the hottest tap-water (which is usually around 120F/50C). Heat the pot of water on the stove until it goes up to 155 F/68 C, then turn off the heat, and slowly submerge the chicken inside the bag, into the water (DO NOT do more than 2 breasts at a time). The temperature will drop back to 150 F/65 C, which is what we want. Now transfer the pot into the preheated oven. Close it. Then set the timer for 1:00. You may need to come back to it once or twice to monitor the temperature for the first time, but once you find the “sweet spot”, it’ll all be effortless.
[/ezcol_1third_end]
[ezcol_2third] [/ezcol_2third] [ezcol_1third_end]
FOR NO WATER-BATH: We want to cook the chicken breasts in dry heat, at 195 F/90 C for 1:40.
Air conducts heat not as well as water, so the temperature needs to be slightly higher compared to a water-bath, and the cooking-time a bit longer. But I prefer this method, which in m opinion, is fuss-free and easier. Preheat the oven 30 min ahead of time until the temperature reaches and stays at 195 F/90 C. Again, always go with the true temperature on the thermometer and NOT the oven setting. Now, without any baking-sheet or pan, place the parchment-wrapped chicken breasts directly on the middle baking-rack (with the skin-side up if your chicken has skin)(that thing on the right was a pork-chop, which is another post). Then set the timer for 1:40.
[/ezcol_1third_end]
[ezcol_2third]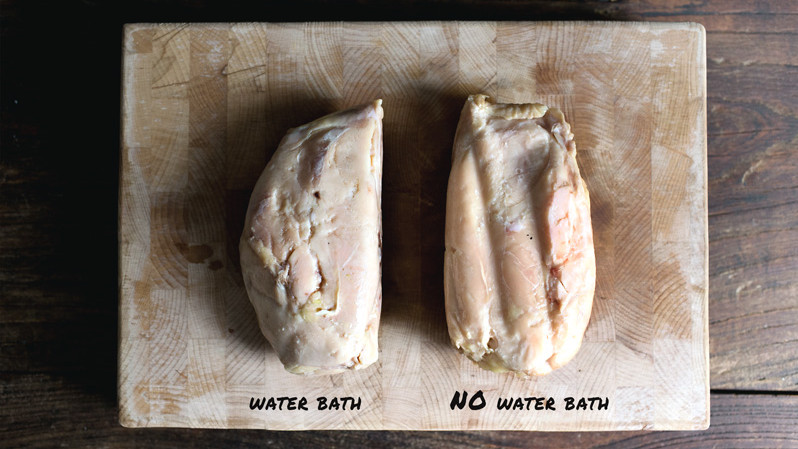 [/ezcol_2third] [ezcol_1third_end]
Remove the chicken breasts from the bath or oven after cooking, and let rest for 15 min.
As you can see, there’s very little difference on the appearance of the cooked chicken breasts, except for the dents from the baking-rack for “no water-bath”. Now if you used skin-on breasts, crisp up the skin in a hot skillet until golden browned. What’s great about this method is that you can cook the breasts the day before, then crisp it up/warm it up before serving.
[/ezcol_1third_end]
I mean can you tell the difference? Which is which? Is this water-bathed? Or no water-bath?
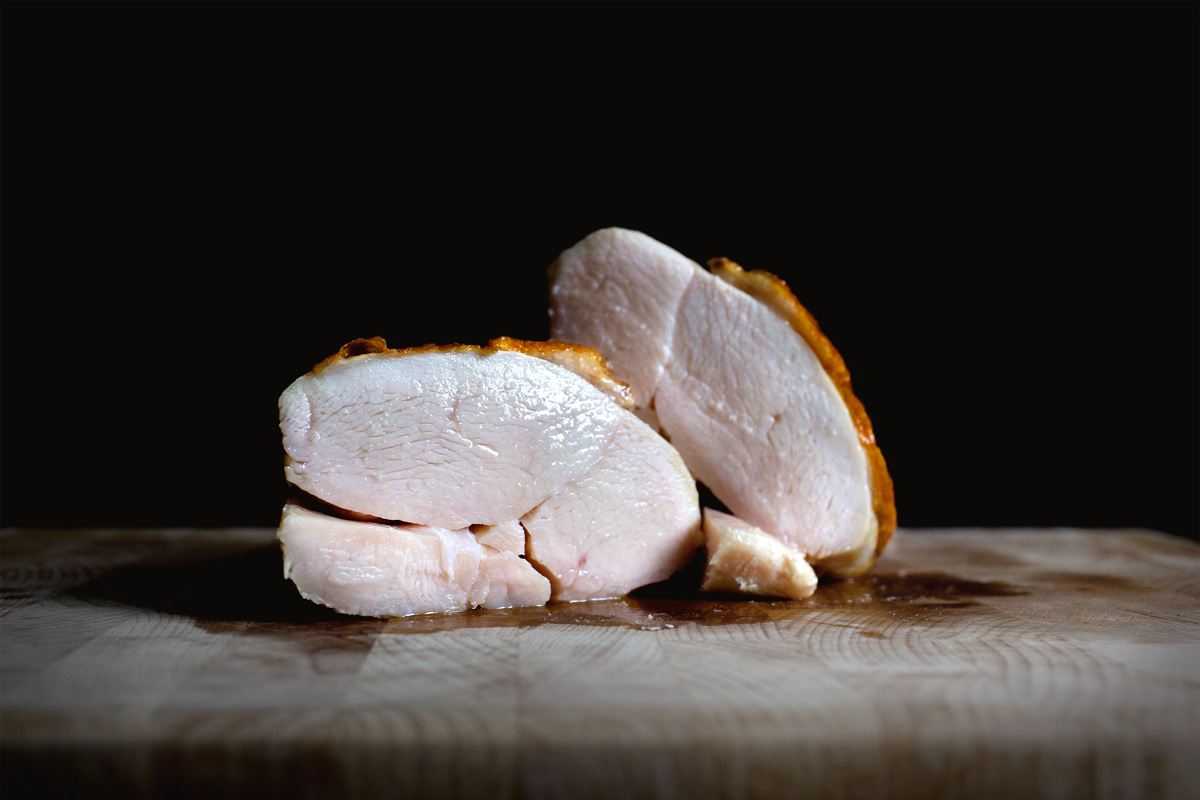
Or is this one water-bathed? Or no water-bath? …. Hmm… I can’t even tell!
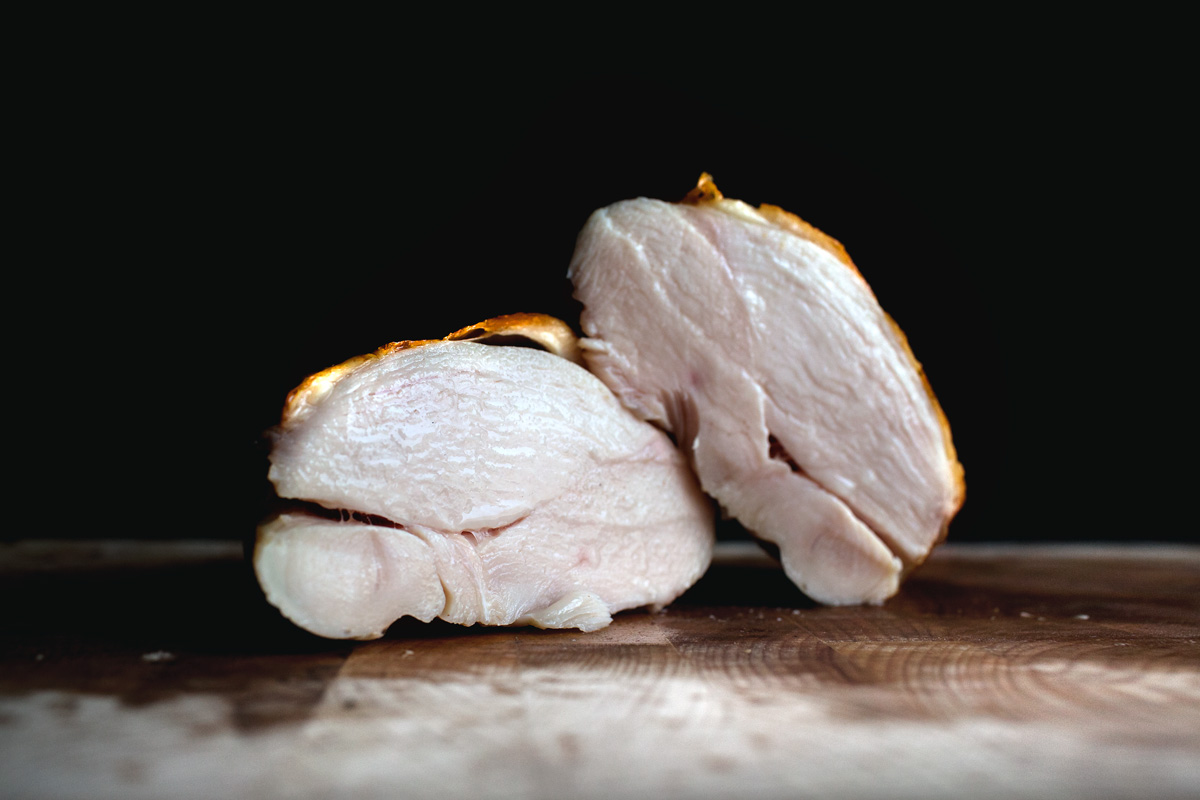
Okay okay, fine, the first one was water-bathed. Or wait, maybe the second one… Seriously, it’s very hard to tell. NOT CHICKEN I tell you, it’s not chicken. It’s something’ else. Alien.
[ezcol_1half] [/ezcol_1half] [ezcol_1half_end]
[/ezcol_1half_end]
[ezcol_2third]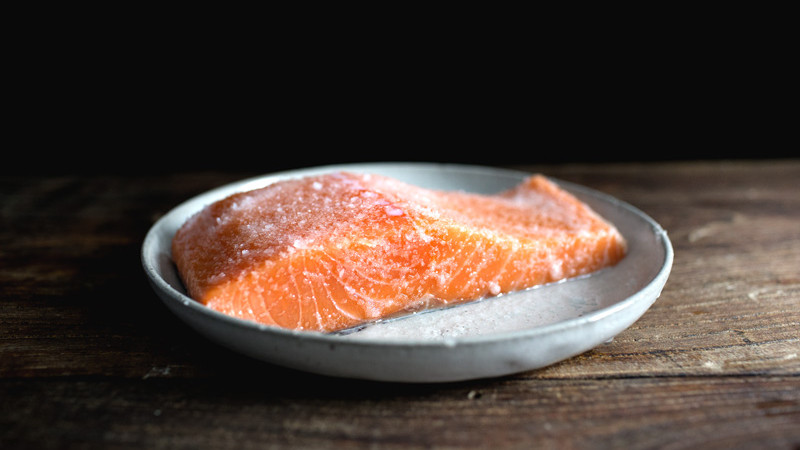 [/ezcol_2third] [ezcol_1third_end]
Now, the set of rules goes just the same as cooking salmon. Rub 1 tbsp of salt on a mid-cut section of a skin-on salmon fillet, and let sit for 30 min. It draws the water out and seasons the fish.
[/ezcol_1third_end]
[ezcol_2third]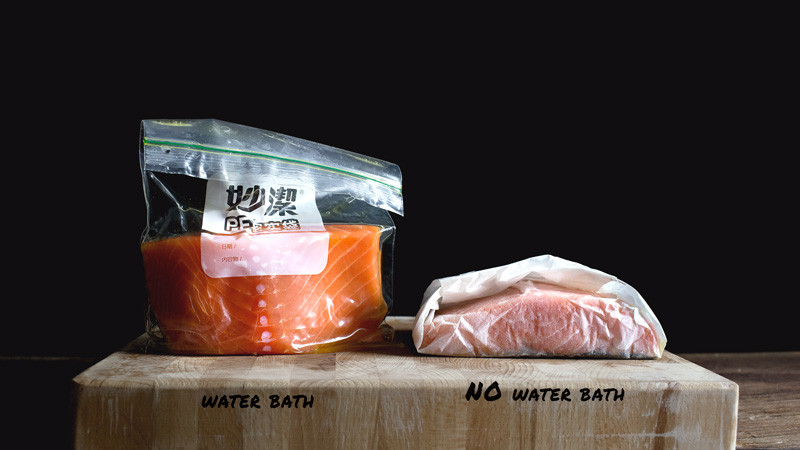 [/ezcol_2third] [ezcol_1third_end]
See, same thing here.
Rinse the salmon off of any excess salt then pat dry with a towel.
FOR WATER-BATH: place the salmon inside a zip-lock bag, then drizzle with just enough olive oil to coat evenly. Zip the bag until it’s 80% sealed, leaving a small air-slit. Then roll the salmon inside the bag tightly, squeezing out as much air as out of the bag as you can, then close the air-slit to seal the bag completely.
FOR NO WATER-BATH: place the salmon on top of a large piece of parchment, then coat it evenly with olive oil. Wrap the salmon tightly inside the parchment like wrapping a sandwich.
[/ezcol_1third_end]
[ezcol_2third][/ezcol_2third] [ezcol_1third_end]
FOR WATER-BATH: We want to cook the salmon in a 120 F/50 C water-bath for 0:40 min.
Preheat the oven 30 min ahead of time until the oven thermometer reads and stays at 150~158 F/65~70 C (the oven-temperature needs to be higher to make up for the heat-loss that goes into cooking the meat). The same techniques. Tie the water/meat thermometer to the pot so it doesn’t fall, then fill the pot with the hottest tap-water (which is usually around 120F/50C). Heat the pot of water on the stove until it goes up to 127 F/53 C, then turn off the heat, and slowly submerge the salmon inside the bag, into the water (DO NOT do more than 2 salmon at a time). The temperature will drop back to 120 F/50 C, which is what we want. Now transfer the pot into the preheated oven. Close it. Then set the timer for 40 min. You may need to come back to it once or twice to monitor the temperature for the first time, but once you find the “sweet spot”, it’ll all be effortless.
FOR NO WATER-BATH: We want to cook the salmon in dry heat at 150~158 F/65~70 C for 1:20.
Preheat the oven 30 min ahead of time until the oven thermometer reads and stays at 150~158 F/65~70 C. Without any baking-sheet or pan, place the parchment-wrapped salmon directly on the middle baking-rack, with the skin-side down. Set the timer for 1:20.
[/ezcol_1third_end]
[ezcol_2third] [/ezcol_2third] [ezcol_1third_end]
Remove the salmon from the bath or oven, and let rest for 15 min.
See, barely any difference.
[/ezcol_1third_end]
This was cooked with water-bath.

This was cooked without water-bath. Really, I have a hard time identifying the photos myself.
[ezcol_2third]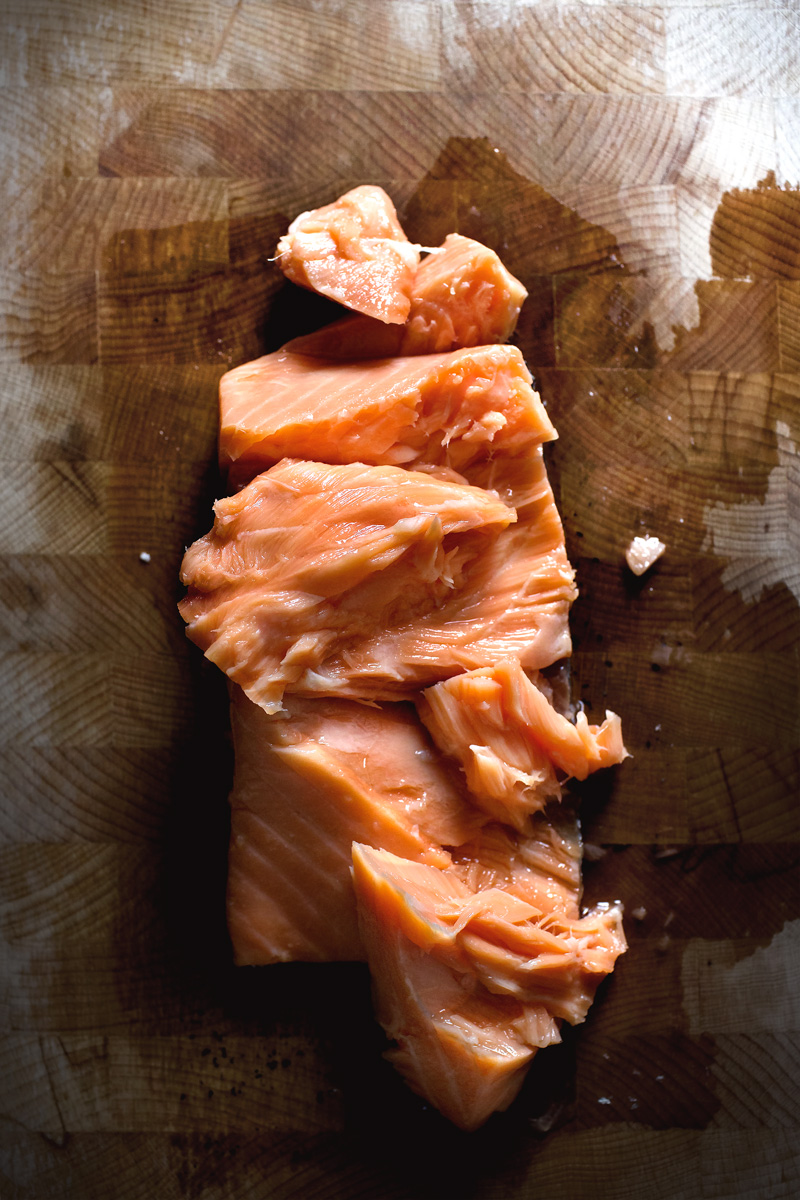 [/ezcol_2third] [ezcol_1third_end]
Nothing but edible epiphany. I urge you to try this technique with this recipe.
[/ezcol_1third_end]
[ezcol_2third]
Crochet plate from Dishes Only.
 [/ezcol_2third] [ezcol_1third_end]
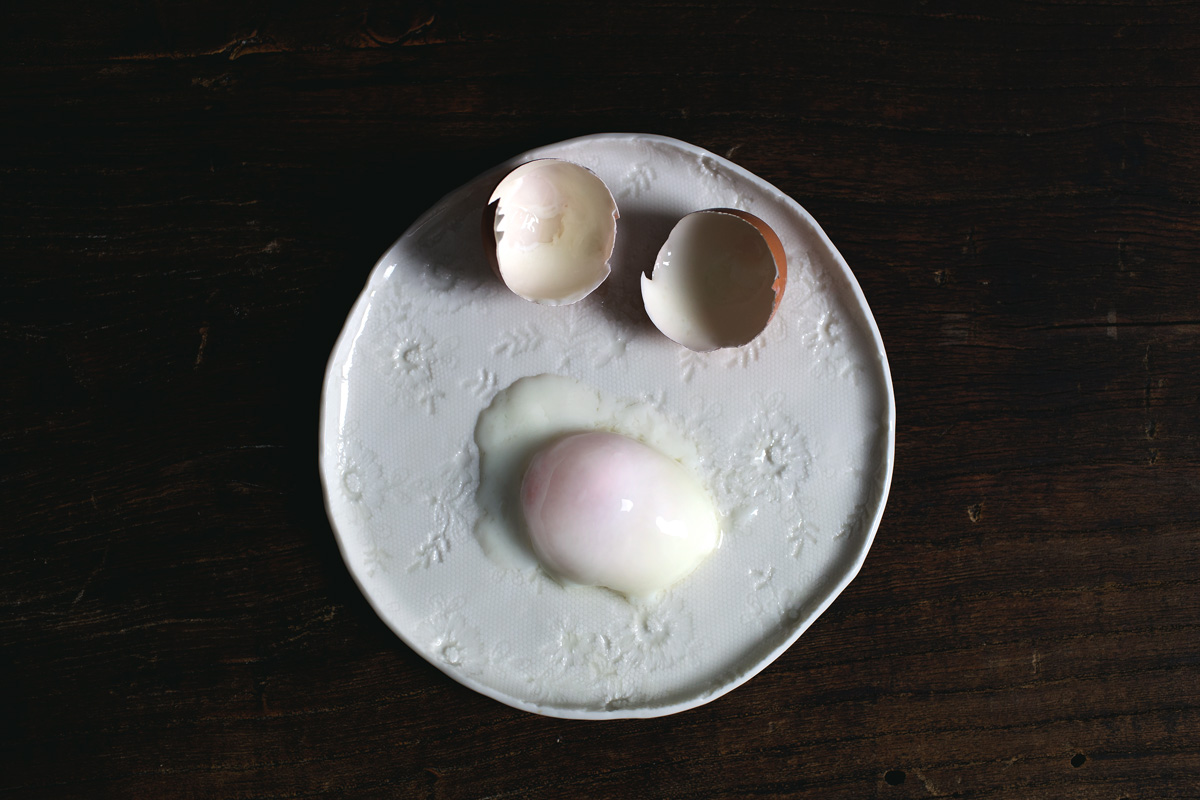
Now, the hot spring/onsen/soft-boiled eggs. I already published a post on cooking these eggs on the stove, or using dry heat which I called sauna eggs (in a nut-shell, we want to cook the eggs in dry heat at 185 F/85 C for 0:53 min), so I won’t repeat myself.
FOR WATER-BATH in the oven: we want to cook the eggs in a water-bath at 158 F/70 C for 0:23 min.
Preheat the oven 30 min ahead of time until the oven thermometer reads and stays at 185 F/85 C (the oven-temperature needs to be higher to make up for the heat-loss that goes into cooking the eggs). The same techniques. Tie the water/meat thermometer to the pot so it doesn’t fall, then fill the pot with the hottest tap-water (which is usually around 120F/50C). Heat the pot of water on the stove until it goes up to 163 F/73 C, then turn off the heat, and slowly submerge the 6~8 large eggs into the water. The temperature will drop back to 158 F/70 C, which is what we want. Now transfer the pot into the preheated oven. Close it. Then set the timer for 23 min. You may need to come back to it once or twice to monitor the temperature for the first time, but once you find the “sweet spot”, it’ll all be effortless.
You can keep the cooked eggs in the fridge, and crack them as needed.
[/ezcol_1third_end]
SUBSCRIBE TO GET NEW RECIPE NOTICES:
[ad_2]
HOW TO EASILY SOUS-VIDE IN OVEN, WITH OR WITHOUT WATER – Lady and Pups